Note: This is an old post from when I wrote on medium.com…formatting may be wonky here until I clean it up.
(Edit on 30 May 2017: Lots of feedback, thanks! One thing to clarify for readers is this is really a step towards a Docker Machine setup vs. a Docker Engine…i.e. using Docker for local development.)
So here’s the thing. I’m normally a macOS user…all my hardware was designed in Cupertino, built in China. But I’m restless and have been toying with trying to switch my daily machine over to a non-macOS system sort of just for fun. I find Linux messy, FreeBSD not as Apple-laptop-friendly as it should be, and Windows a non-starter. Luckily, I found a friend in Puffy.
Switching some of my Apple machines over to dual-boot OpenBSD left a gaping hole in my workflow. Luckily, all the hard work the OpenBSD team has done over the last year seems to have plugged it nicely!
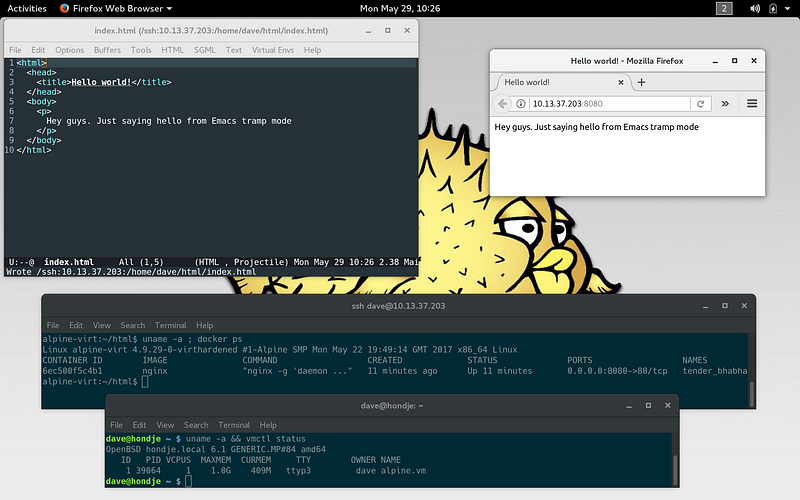 OpenBSD 6.1-current — editing HTML on an Alpine Linux VM via Emacs tramp-mode and served up via Docker!
Our Story’s Hero: VMM/VMD
OpenBSD’s hypervisor support officially made it into the 6.1 release, but after some experimentation it was rather time consuming and too fragile to get a Linux guest up and running (i.e. basically the per-requisite for Docker). Others had reported some success starting with QEMU and doing lots of tinkering, but after a wasted evening I figured I’d grab the latest OpenBSD snapshot and try what the openbsd-misc list suggested was improved Linux support in active development.
Conventions!
All commands that are prefixed with $ are run as your user account. Those starting with # are done as root.
Assumptions!
This isn’t your first OpenBSD rodeo and you know how to configure [doas](http://man.openbsd.org/doas) .
10 (11?) Steps to Docker — the How-To
Here’s a step-by-step guide for the impatient. It works on my MacBook Pro 12,1 (13”, i5–5257U) but should work on other Intel-based systems from the same era.
Step 0 — Install the latest OpenBSD 6.1 snapshot (-current)
Great documentation on the inter webs. If you can’t get past step 0, I’m sorry but I can’t address those issues in this post. Apologies. Make sure you configure your machine as you see fit. (I recommend Keith Burnett’s Installing OpenBSD 6.1 on your Laptop is really hard (not) as a good example, though I adapted some if it for Gnome 3.)
Step 1 — Configure VMM/VMD
The man docs are good for this, but I recommend this walk-through from HiR mentioned on BSDNow recently. (There has been some recent work done in VMM that makes networking easier, but the linked walk-through is good for getting a sense of how to manage a network of virtual machines on your OpenBSD system.)
Follow that walk-through for setting up _vether0__(that’s a zero at the end)_ and you can use the parts about an OpenBSD guest to verify your networking and VMM config.
ASIDE: If you have avahi-daemon installed, you may want to modify
/etc/avahi/avahi-daemon.confto ignore your virtual ethernet device. See this gist for an example of some lines to tweak.
Step 2 — Grab an Alpine Linux ISO
I recommend grabbing the latest Alpine Linux ISO, specifically the one that’s built for “virtual systems.” It’s small and fast.
$ curl https://nl.alpinelinux.org/alpine/v3.6/releases/x86_64/alpine-virt-3.6.0-x86_64.iso -o alpine-virt-3.6.0-x86_64.iso
Step 3 — Make a new virtual disk image
You can call it something else and give it a different size, but for our purposes we’ll call it alpine-virt and make it a 6 GB disk.
$ vmctl create alpine-virt.img -s 6G
Step 4 — Boot Alpine’s ISO
The latest (via -current) VMM will actually boot the Alpine ISO, but we have to be careful with disk order. It also seems to provide better network device support (auto-magically making a switch and running DHCP!?). We’re going to assume you created your own switch called “local” for now.
$ doas vmctl start alpine-vm -c -d alpine-virt-3.6.0-x86_64.iso -d alpine-virt.img -m 1024M -n local
Step 5 — Inhale that fresh Alpine air
You should be connected up to your Alpine instance. Alpine has a good wiki with installation details but the installer is pretty straight-forward like OpenBSD’s. You should also have network access via your virtual switch, so select dhcp and it’ll grab an IP for you.
Some things to note during the install:
- Your virtual hard disk will probably be /dev/vdb during the install. This will change in Step 6, but luckily it auto-configures the disk UUID in /boot/extlinux.conf
- It seems to “just work” even without tweaking the extlinux settings (Alpine doesn’t use GRUB), but if you want you can be safe and follow Alpine’s documentation on enabling serial console on boot.
When your install is done and you’ve done any extlinux tweaking you desire (if any), power off with:
# poweroff
You will have to hit enter a few times and then type: ~.
This combo (enter, then tilde then period) should detach you from the virtual serial console session and drop you back to your OpenBSD shell.
Step 6 — Boot Alpine for Reals
Get yourself a lucky charm or something because now we’re going to boot your new vm. Hopefully it works :-). You’ll notice we simply remove the reference to the ISO and re-run the vmctl start command.
$ doas vmctl start alpine-vm -c -d alpine-virt.img -m 1024M -n local
You should see the system boot up. You might have to hit enter a few times. (You can tweak extlinux to remove that useless-for-our-purposes boot menu. See the appendix.)
If you’re at the login prompt, it’s time to celebrate!
Now login as root and we’re going to take care of business.
Step 7 — Install Docker
You SHOULD have internet access via your virtual switch, assuming your host OpenBSD system is properly routing to the internet.
Edit /etc/apk/repositories un-commenting the line that looks like:
http://dl-3.alpinelinux.org/alpine/v3.6/community
(Ponder, for a moment, why it’s not an https url…)
Now install docker by simply running:
# apk add docker
Step 8 — Make a User
Alpine by default won’t allow a root login over SSH and honestly you should feel icky doing everything logged in as root. Make a new user:
# adduser dave -G wheel,docker
I recommend also installing sudo and configuring /etc/sudoers to allow your user or members of wheel ability to run sudo’d commands.
Step 9 — Ditch the Serial Console
It’s a bit flaky at the moment and I’ve seen lockups that make you think the VM is hung. Do the old ~. routine to detach and instead ssh into your VM as your new user. This has proven (to me at least) to be far more stable (and honestly more usable).
Step 10 — Test out your Docker instance
OK, let’s do something trivial. You’re ssh’d into your Alpine VM, right?
$ mkdir -p ~/www $ echo ‘
HELLO WORLD!’ » ~/www/index.htmlNow, let’s see if we can get nginx running inside a Docker container and accessible via OpenBSD! We’ll serve up that simple index.html file we just made.
$ docker run –name nginx-test -v ~/www:/usr/share/nginx/html:ro -p 8080:80 -d nginx
You should see a running docker container if you run docker ps . If not, something is wrong :-(
Now, on your host OpenBSD machine, use curl or a browser to hit: http://<ip of vm>:8080
You should be greeted with your rendered HTML!
Acknowledgements
This wouldn’t have been possible without lots of GREAT source material available online (or locally):
- OpenBSD’s man pages, obviously
- Ax0n’s great VMM write-up on the HiR Information Report
- BSDNow for pointing me to the above!
- The chatter on the OpenBSD-misc mailing list
- Last, but not least, the efforts of those that brought us VMM in the first place! (Mike Larkin, Reyk Floeter, etc.)
Appendix A — Going Further
I haven’t done it yet, but I plan on installing [docker-compose](https://docs.docker.com/compose/) via Python’s pip package manager. I prefer defining containers in the compose files.
If you’ve been baptized in the Church of Emacs, I highly recommend using Tramp mode to make development and management of your VM’s files easier.
Appendix B— extlinux.conf for Alpine
Here’s an example /boot/extlinux.conf that, as of publish time, worked for me. It might not need the serial console stuff anymore, but I added it to be safe.