Note: This is an old post from when I wrote on medium.com…formatting may be wonky here until I clean it up.
 Image by Kurt Edblom shared under CC BY-SA 2.0 (https://flic.kr/p/fanASg)
With bonus tips for configuring OpenBGPD!!!
I’m experimenting with integrating OpenBSD into our infrastructure as a firewall and HTTP reverse-proxy. We currently host our data tier using Packet’s bare metal hosting, but sadly Packet doesn’t currently offer OpenBSD as a 1-click install OS.
However, they do make PXE booting simple and thanks to https://netboot.xyz/ we can easily perform the install ourselves!
Assumptions
- You’re familiar with provisioning a server with Packet.net.
- You’ve got the SSH key configured for your Packet.net account.
- You’ve got some familiarity with installing OpenBSD or don’t mind learning. (Honestly it’s one of the easiest installers around.)
Note: if you see notation in this tutorial like
myname(5)then it’s either a command or file that has a man page entry. You’re encouraged to find more information on the topic by typingman 5 mynameon an OpenBSD system or conveniently just going to https://man.openbsd.org and searching for “myname”.
Getting to the OpenBSD Installer
We’ve got a few relatively easy steps to do before we can get to the installer.
1. Create a new Custom iPXE Server
We need to get to the OpenBSD boot loader. To do that we use PXE and https://boot.netboot.xyz.
Provision a new server (t1.small.x86 works great) and for the OS select “Custom iPXE.” A confusingly unlabeled text box should appear. In that box, enter the URL for the hosted PXE chain loader: https://boot.netboot.xyz
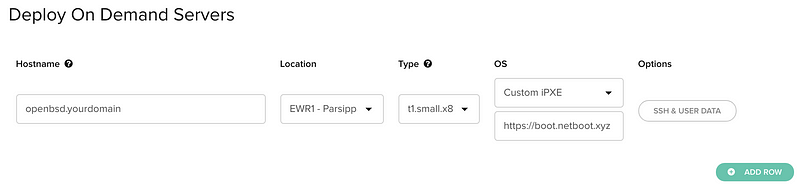 Obviously choose your hostname and location as you see fit. Note: this guide uses t1.small.x86 for the type.
Side Note: If you’ve not familiar with the custom iPXE boot option on Packet and need to try rebooting, make sure you’ve set the machine to iPXE boot on restart by using “always iPXE boot” or other options via the Packet UI. You can always turn it off once you’re past step 3 below.
2. SSH into Serial Console
The system should take a moment to provision, but once it appears in the servers listing, click into the new server.

Find the “Out of Band Console” button near the top and click it. You should get SSH details. Use them with your SSH key to connect to the serial console Packet.net exposes. (If you’ve used a serial console like cu(1) on OpenBSD you’ll find the behavior pretty similar i.e. use ~. to drop the connection.)
3. Use netboot.xyz to boot from the OpenBSD ISO
After your connected via the “Out of Band Console”, you should notice the system PXE booting the netboot.xyz image. If that goes well, you’ll end up at a curses-like menu where you can select “BSD” and then “OpenBSD” and the version. The netboot.xyz chainloader will then download the ISO and chain boot it for you!
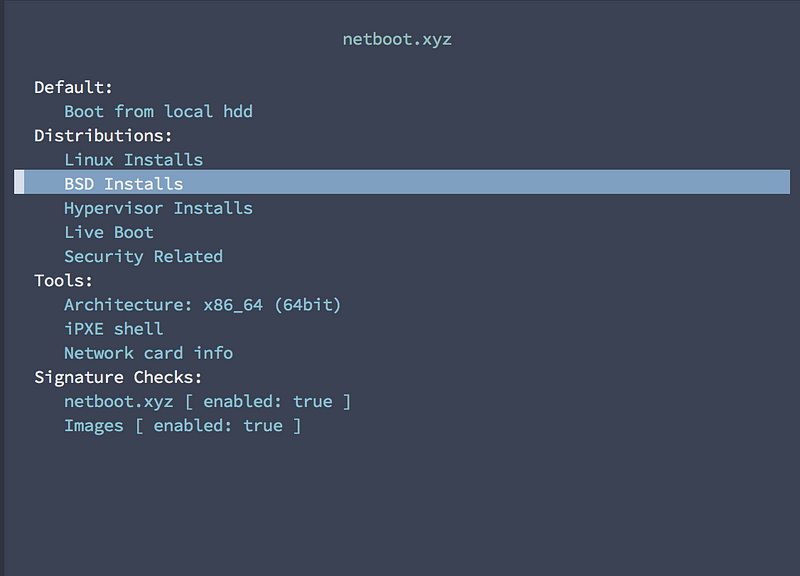 Hopefully you get here…select BSD Installs and then your OpenBSD version
4. Configure the Serial Console
Once at the OpenBSD boot loader prompt, resist the excitement to just hit [enter] to boot. We need to set the serial console properly since you’re currently communicating over com1 and not the default com0.
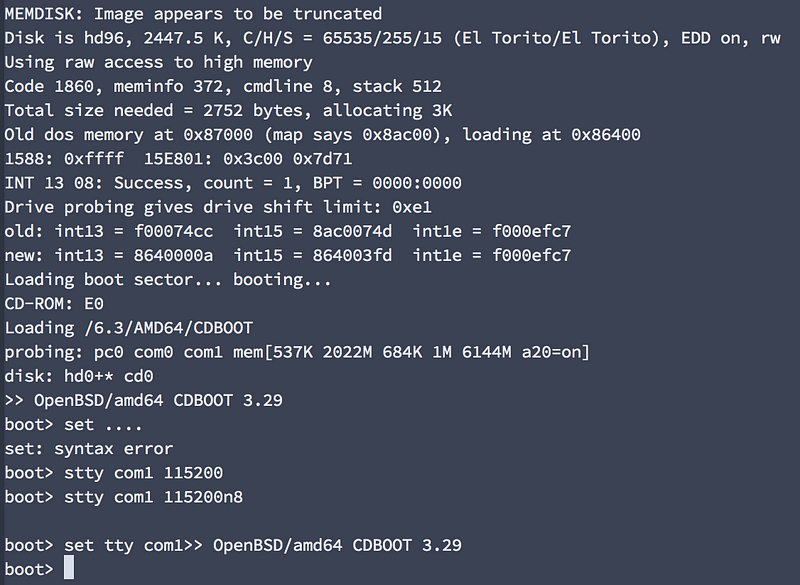 My first attempt fat-fingering everything…ugh
>stty com1 115200n8 >set tty com1 >boot
You should be graced with a booting OpenBSD ramdisk if all goes well! If you were too excited and booted prior to setting the tty properly…you’ll think you’ve got a hung system when in fact you’re just not seeing any output. Reboot and return to Step 2 and let’s try not to speak of this again, ok?
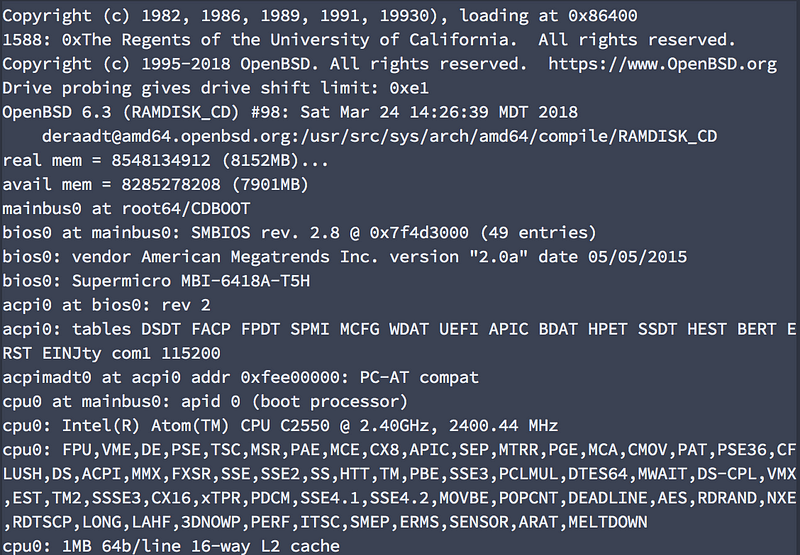 Booting!
Installing OpenBSD
This part is pretty standard, but there are some things we can do to not only make it easier, but also save us some work after rebooting.
Configuring Networking
You can take a bit of a shortcut and use dhcp to configure networking. Most, if not all, Packet servers have multiple ethernet devices they bond together, but in at least the t1.small.x86 (aka the cheapest intel-based system) the only device active will be em0.
When prompted to configure networking, say you’d like to configure em0 and for the IPv4 settings just enter dhcp. Packet apparently has a DHCP server responding that will tell your server it’s public IPv4 management address Packet auto-assigned. We’ve got some extra work to do later on so entering this all by hand now isn’t worth it :-)
Disks and Other Stuff
Unless you know what you’re doing, just rock the defaults. Keep default auto-partitioning and use the default whole disk (MBR) setup. You can definitely change these things, but this guide isn’t here to guide your customization…just to get your running. Consult the man pages and docs if you’re new to this and planning on changing defaults.
 I always love this celebration
Doing The Right Thing (with SSH)
OK, so you should be through the installer now and it’s asking you if you’d like to (R)eboot or drop into the (S)hell. Here’s where you’ve got to acknowledge the world is a dangerous place and you should be using key-based auth with SSH.
The SSH Plebeian Path
Maybe you’re lazy right now or you think this is “just a throw away system.” Fine. Just (R)eboot and SSH into the box using the public IPv4 address and your password. I can’t fault you…but make sure you’ve disabled PXE boot on your Packet server if it’s set to persisted mode!
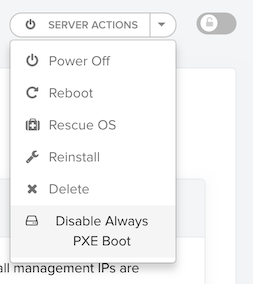 You should check this at this point before you reboot!
The SSH Noble Path
Great, you’ve made the right choice. Now let’s get the party started and you can now select (S)hell at the end of the installer and voila you’re at a # prompt.
I won’t go into the fine details, but here’s what you’ve got to do yourself since Packet isn’t doing it for you:
- Set
PasswordAuthentication noin/mnt/etc/ssh/sshd_config - Add your SSH public key to
/mnt/home/<your user>/.ssh/authorized_keys
Here’s a hint, though, if you’re struggling to manipulate those files with sed(1) or ed(1) or whatever minimal tools are in the OpenBSD ramdisk:
# chroot /mnt # export TERM=vt220
Hey, if you’d like to learn
_ed(1)_, check out Ed Mastery, the best April Fools “joke” ever, by Michael W. Lucas.
Choose Your Own (Networking) Adventure Time
Did you “do the right thing” above or did you chose to just reboot? If you’re on the Noble Path, you have another choice to make involving how we setup networking. How exciting! If you’re on the Plebian Path and already rebooted, well…you’re stuck with Option 2. Whichever option you follow, you can follow the Configuring Networking section the same way.
Again: Make sure you’ve disabled PXE boot!!!
If you haven’t checked, make sure you’ve now disabled PXE boot in the Packet settings for your server. If you don’t, you’re not going to reboot into OpenBSD and your server won’t come online with its public IP’s. Note: You can do this while still in the OpenBSD installer.
Option 1: Configure Networking before Reboot
This is probably the ideal option as it reduces reboots or some steps later and, if done correctly, lets your server reboot into a perfectly working state ready for use with Packet features.
Option 2: Reboot, then configure Networking
If you used DHCP for configuring em0, the system should come back online automatically using the public IPv4 address. At this point, you can ssh into the box and follow the below steps…but you’ll most likely want to reboot again to make sure they work.
On the plus side, you’re booted into your system and can pkg_add things like vim or whatever floats your boat for editing files.
Configuring Networking (for real now)
I’ve devised the following steps from experimentation, but also from looking at a Packet’s FreeBSD 11.1 system as a reference since it’s somewhat close to OpenBSD in nature in that the networking pieces are understandable and not like Linux’s mess. I did consult some of the Packet docs online…but they’re quite thin and 100% Linux focused *womp womp*.
The Default Gateway
This part is easy. Edit the file /etc/mygate (see myname(5) for details) and enter the two public management IP gateways Packet lists in your server config screen. The should appear explicitly in the Overview screen for your server.
For example, if you have an IPv4 gateway of 147.75.12.34 and an IPv6 gateway of 2604:1380:1:abcd:: then you’d simply have /etc/mygate contain:
147.75.12.34 2604:1380:1:abcd::4
Easy peasy!
Stub “em” out
A step easier than the previous!
Assuming your server has 2 Intel Ethernet devices, chances are they’re em0 and em1. (Adapt this section as you see fit for the type of server you provisioned.)
As root (if you’re not already), we’re going to just overwrite their hostname.if(5) definitions:
# echo up > /etc/hostname.em0 # echo up > /etc/hostname.em1
We’re just telling the system to bring those links up, but don’t deal with assigning IP addressing yet. We’ll do that next by tying them together into an aggregated trunk(4) device to take advantage of Packet’s pretty nice networking setup.
Keep on Trunkin’
For the following section, suppose your management IPs provided by Packet are the following:
- Public IPv4:
147.75.12.35 - Public IPv6:
2604:1380:1:abcd::5 - Private IPv4:
10.100.100.1
Packet aggregates (or bonds) the physical Ethernet connections on your server and for best results we need to set up a trunk(4) device to take advantage of this behavior and to make the multiple physical adapters work together for the same IP addressing.
CAUTION THOUGH, there are two potential aggregation modes to choose from depending on the type of server you provisioned! Take note of which you’ll be using:
- If using a t1.small.x86 system: use
trunkproto loadbalance - Otherwise if NOT using a t1.small: use
trunkproto lacp
Create and edit /etc/hostname.trunk0 and we’re going to make it look like the following containing our primary IPv4 address as the Public IPv4 address and the others as aliases. Since we’re using a t1.small.x86 in this example, we’re going to use the loadbalance protocol.
trunkproto loadbalance trunkport em0 trunkport em1 inet 147.75.12.35 255.255.255.254 inet alias 10.100.100.1 255.255.255.254 inet6 alias 2604:1380:1:abcd::5 127 up
If you haven’t used a trunk device before on OpenBSD, it’s pretty rad. I use one on my laptop to automatically failover between my hardwired Ethernet connection and my laptop’s WiFi. Check out Trunking your wireless adapter at https://www.openbsd.org/faq/faq6.html#Wireless
Cross your Fingers and Reboot!
You should now be safe to reboot. Why not? You can always reconnect via the Out-of-Band Console!
If things go well, you should be able to ping/ping6 your Public management addresses. SSH’ing into either, you should still have proper network access via the trunk0 device.
Now go play around and have some fun! Or at least run syspatch and reboot!
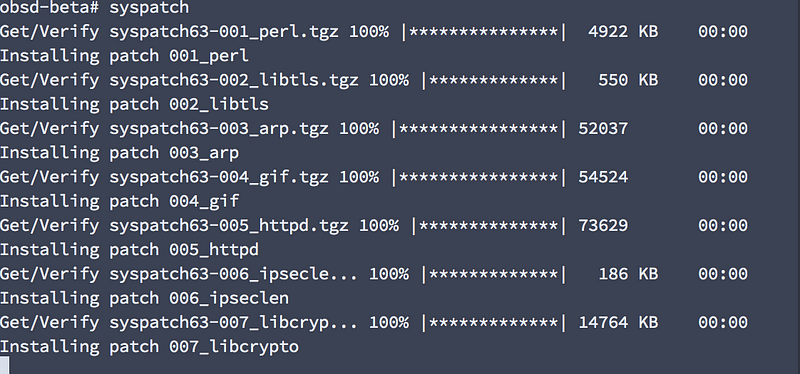 A free public service announcement: ALWAYS RUN SYSPATCH AFTER FIRST BOOT!
Now what?
Hopefully you’ve got some use case for keeping OpenBSD around. Obvious ones are using pf, httpd, or relayd to help bring sanity to your environment. If you’re looking for ways to extend the above guide, here are some thoughts for things I may or may not get to:
- Automate the above! See if you can use Packet’s API and something like Ansible to automate the process.
- Host your own PXE boot stuff! Install or configure tftp and have new OpenBSD hosts pull from one of your own servers to bootstrap a new host.
- Or continue on and play with BGP…
** Bonus Tip: Local BGP! **
Packet seems to be relatively unique in that they encourage customers to deploy and manage their own BGP servers. This is kinda cool and lets you get in over your head!
If you’ve read Michael W. Lucas’s Networking for Systems Administrators, you might recall his warning that if you come across mentions of BGP you should run away fast…or something like that. Well, the good news is if you’re playing around in a dedicated Packet project then you really can’t ruin anything so let’s have some fun!
(Seriously though: my first few attempts at this failed in such a manner that I wasted hours of my life wondering why I could get a Linux system using BIRD working but kept failing at doing so with OpenBSD…even using BIRD on OpenBSD! I still can’t explain why it works now.)
Step 1: Install…Nothing!
That’s right, OpenBGPD comes built into OpenBSD as bgpd(8). Talk about easy!
Step 2: Enable Local BGP on your Packet project
Follow the steps outlined by Packet by requesting Local BGP for your project but ignore the “Sample Local BGP Configuration” as it’s Linux specific. (It also uses BIRD, which does work for our use case and is available on OpenBSD in ports…but let’s stick with the built-ins for now.
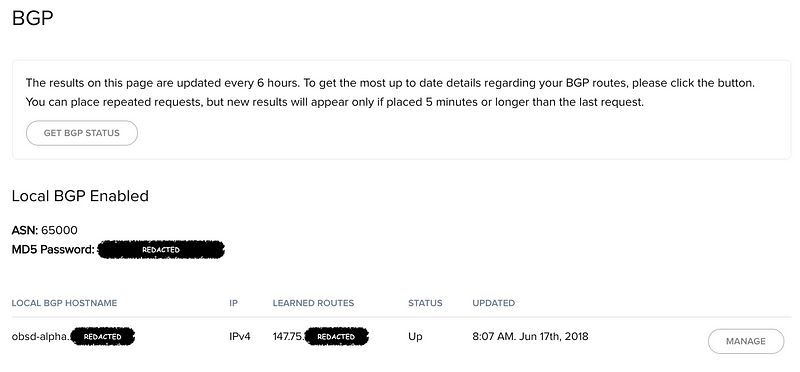 From the Packet “IPs & Networks -> BGP” screen. You’ll be trying to recreate this scenario where Packet’s BGP system sees your local OpenBGPD instance and learns our desired route.
Step 3: Get a public IPv4 Elastic IP
The whole point here is we’re going to have Packet work with your local BGP instance to route traffic from a public facing Packet elastic IP to your self-managed address assignment.
Note: do NOT assign the Elastic IP using Packet’s API or web admin UI. Just make sure it’s allocated to your project. If you assign it, Packet will define a static route and that defeats the whole purpose of this!
In this case, we’ll work with the fictitious elastic IPv4 address space of 147.75.75.75/32 (a single IP), but this also applies if you’re going to use a larger address space (i.e. /31 /30 etc.)
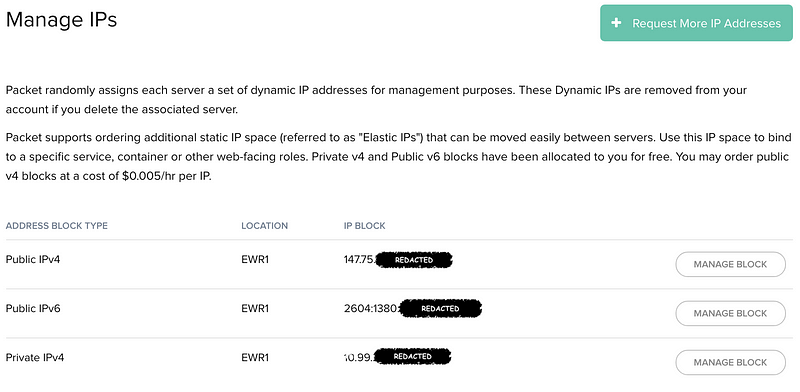 Once granted, you should see a new Public IPv4 address block available in your project IP settings.
Step 4: Manually assign one of the IP’s on your OpenBSD server
In Packet’s example, they add it as an alias on the loopback adapter. This is easy to do:
# ifconfig lo0 inet alias 147.75.75.75/32
You could also experiment with creating a vether(4) device and assigning it to that:
# ifconfig vether0 create # ifconfig vether0 inet 147.75.75.75/31
(Note: I used a different netmask on my own system but I updated the above ifconfig command to match my screenshot of the output. Just an FYI if you’re wondering why I’m using /32 for lo0 and /31 for vether0 above.)
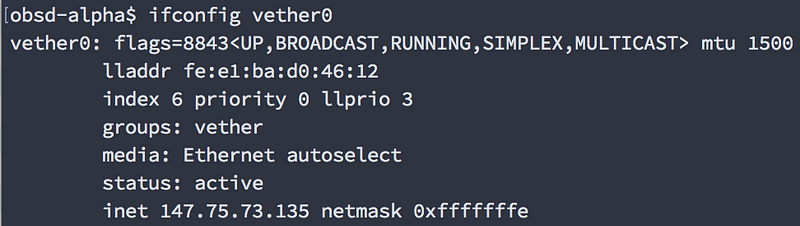 If you used a vether device you should see this output. Try not to fe:e1:ba:d about it, ok?
Step 5: Edit /etc/bgpd.conf
When you enable BGP on a server via Packet, they provide a sample BIRD config. You can grab some of the pertinent details, but all you need to know are:
- The ASN Packet’s gateway is using (e.g.
65530) - Your server’s private management IPv4 address (e.g.
10.100.100.1) - Your server’s private management IPv4 gateway (e.g.
10.100.100.0) - The password you set for BGP (e.g.
MyS3cre3tPassw0rd) - The (soon to be) publicly accessible IPv4 address space we’re going to manage routes for (e.g.
147.75.75.75/32)
Edit or replace /etc/bgpd.conf to make it resemble the following for configuring which network we’re managing and how to connect to the Packet gateway as our neighbor (hi, neighbor!):
AS 65000 router-id 10.100.100.1 log updates network 147.75.75.75/32 set localpref 150
neighbor 10.100.100.0 { remote-as 65530 descr “packet gateway” tcp md5sig password MyS3cr3tPassw0rd }
We’re going for a super simple example. I’m by far not an networking expert and I’m sure comparing this to /etc/examples/bgpd.conf could surface some wisdom. And there’s always the bgpd.conf(5)man page.
Step 6: Start bgpd
Fire it up!
# rcctl enable bgpd # rcctl start bgpd
You can tail /var/log/daemon to watch the logs. You should see something like the following (note: I’ve trimmed timestamps and hostname for brevity):
bgpd[8210]: startup bgpd[8210]: rereading config bgpd[19703]: session engine ready bgpd[22562]: route decision engine ready bgpd[19703]: listening on 0.0.0.0 bgpd[19703]: listening on :: bgpd[19703]: SE reconfigured bgpd[19703]: neighbor 10.100.100.0 (packet gateway): state change None -> Idle, reason: None bgpd[19703]: neighbor 10.100.100.0 (packet gateway): state change Idle -> Connect, reason: Start bgpd[22562]: RDE reconfigured bgpd[19703]: neighbor 10.100.100.0 (packet gateway): state change Connect -> OpenSent, reason: Connection opened bgpd[19703]: neighbor 10.100.100.0 (packet gateway): state change OpenSent -> OpenConfirm, reason: OPEN message received bgpd[19703]: neighbor 10.100.100.0 (packet gateway): state change OpenConfirm -> Established, reason: KEEPALIVE message received bgpd[22562]: neighbor 10.100.100.0 (packet gateway): received IPv4 unicast EOR marker bgpd[22562]: neighbor 10.100.100.0 (packet gateway): sending IPv4 unicast EOR marker
Step 7: Ping it from Space
Or at least your local workstation that’s not on the Packet network. You should get through!
Step 8 and beyond: where to go from here?
Hopefully you have some ideas for what you want to do with OpenBSD, but may I recommend https://www.openbsd.org/faq/index.html if you don’t have ideas? Here are some small ones:
- Make your public IPv4 alias permanent by creating/modifying
hostname.lo0ofhostname.vether0. - Configure a 2nd OpenBSD host and test out load-balanced routing.
🐡 Thanks! 🐡
I hope you find this guide helpful. If you find yourself using OpenBSD now more than ever…or for the first time even…think about maybe kicking some money to the OpenBSD Foundation that funds the hackathons and covers some development costs for the core team and contributors.