Previously, we looked at how PaySim models mobile money networks to simulate hidden fraudulent behavior and how my fork1 makes it possible to build off the original authors’ work and model more realistic fraud cases.
In this post, we’ll put PaySim 2.1 to work and integrate it to Neo4j’s graph database.
NOTE: Throughout this post, I’ll refer to my fork of PaySim as just “PaySim” to avoid having to constantly distinguish it as “PaySim 2.1” or something similar.
Prerequisites for you Home Gamers
If you plan to follow along, here’s what you’ll need on your local workstation:
- JDK 8 or 112
- Neo4j v3.5 (community or enterprise)
- Clone or download the paysim-demo project
The paysim-demo project uses a gradle wrapper, so you shouldn’t need
to install anything else assuming it can find your local Java
installation provided by the JDK.
If you’re new to Neo4j, I recommend grabbing a copy of Neo4j Desktop to make it easier to get started. Check out the online guide and configure a new project to follow along.
Starting with the End in Mind
Ultimately, we want to populate a graph in Neo4j, but our graph should facilitate a few types of data exploration we’ll want to perform to test our fruad detection approaches:
- We’ll want to easily know which Clients are actually Mules and working on behalf of fraudsters. (This is important since Fraudsters act as invisible hands in the network.)
- We need to relate identities to Clients so we can detect identity reuse.
- We want to easily see a timeline of a Client’s behavior in terms of their Transactions, so we want an easy to follow traversal path or chain.
Everything except the chaining was visible in our previous data model, so here’s how it should look when we’re done:
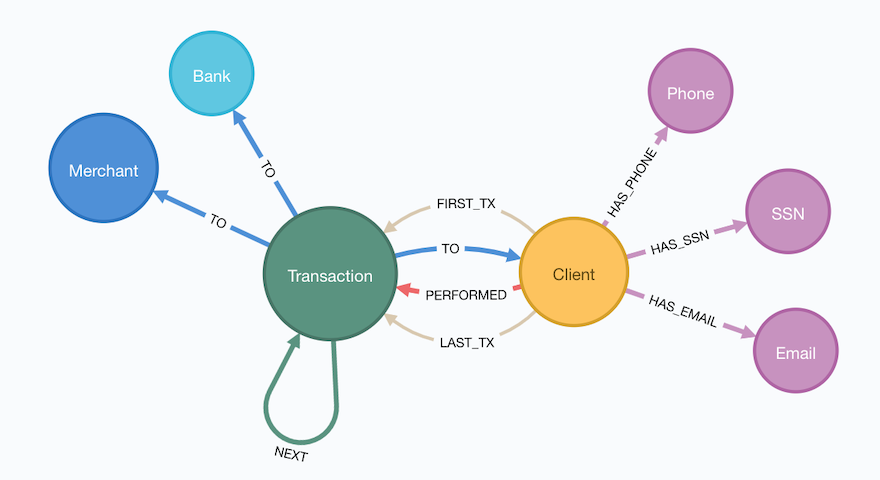
Figure 1: Our target PaySim 2.1 data model
You’ll notice to support event chaining that there are now additional relationships between Clients and Transactions along with Transactions to other Transactions. We’ll get into details as to how/why later in this post.
Time to Write Some Code!
We’re going to dive into the weeds a bit around implementing a simple Java app that will drive PaySim and feed data to Neo4j. Feel free to skim the code parts and focus on just the logic/overviews if Java isn’t your “cup of tea.” 😉 For you JavaScript folks, I tend to use Java 8’s newer closure/stream/etc. capabilities meaning it’ll read closer to something you may recognize, so try not to skip ahead!
I recommend having some familiarity with the workings of the Neo4j Java Driver, so take a moment and check out the the latest manual available at https://neo4j.com/docs/driver-manual/4.0/.
We’ll walk through six (6) steps to populate our graph:
- Schema creation
- Iteratively load PaySim transactions
- Disguising the Mules
- Loading identities
- Updating any additional properties
- Threading transactions into event chains
We’ll look at each step in isolation and then I’ll show you how it can be all put together.
Step 1: Enforcing a Schema
Neo4j is a database and while closer to a NoSQL database than an RDBMS, like any database it performs better if you can describe a bit about the constraints of your system.
In our case, we know some facts about how PaySim models behavior,
specifically the uniqueness properties of agents, identifiers, and
transactions. Let’s make some basic uniqueness assertions using
Cypher’s CREATE CONSTRAINT ON clauses.
// Core Types
CREATE CONSTRAINT ON (c:Client) ASSERT c.id IS UNIQUE;
CREATE CONSTRAINT ON (b:Bank) ASSERT b.id IS UNIQUE;
CREATE CONSTRAINT ON (m:Merchant) ASSERT m.id IS UNIQUE;
CREATE CONSTRAINT ON (m:Mule) ASSERT m.id IS UNIQUE";

// Transaction Types
CREATE CONSTRAINT ON (tx:Transaction) ASSERT tx.id IS UNIQUE;
CREATE CONSTRAINT ON (c:CashIn) ASSERT c.id IS UNIQUE;
CREATE CONSTRAINT ON (c:CashOut) ASSERT c.id IS UNIQUE;
CREATE CONSTRAINT ON (d:Debit) ASSERT d.id IS UNIQUE;
CREATE CONSTRAINT ON (p:Payment) ASSERT p.id IS UNIQUE;
CREATE CONSTRAINT ON (t:Transfer) ASSERT t.id IS UNIQUE;

// Identity Types
CREATE CONSTRAINT ON (e:Email) ASSERT e.email IS UNIQUE;
CREATE CONSTRAINT ON (s:SSN) ASSERT s.ssn IS UNIQUE;
CREATE CONSTRAINT ON (p:Phone) ASSERT p.phoneNumber IS UNIQUE;
Personally, I like to implement these types of pre-requisite schema queries by defining them in some sort of array:
public class Cypher {
        public static final String[] SCHEMA_QUERIES = {
        // Core Types
        "CREATE CONSTRAINT ON (c:Client) ASSERT c.id IS UNIQUE",
        "CREATE CONSTRAINT ON (b:Bank) ASSERT b.id IS UNIQUE",
        "CREATE CONSTRAINT ON (m:Merchant) ASSERT m.id IS UNIQUE",
        "CREATE CONSTRAINT ON (m:Mule) ASSERT m.id IS UNIQUE",

        // Transaction Types
        "CREATE CONSTRAINT ON (c:CashIn) ASSERT c.id IS UNIQUE",
        "CREATE CONSTRAINT ON (c:CashOut) ASSERT c.id IS UNIQUE",
        "CREATE CONSTRAINT ON (d:Debit) ASSERT d.id IS UNIQUE",
        "CREATE CONSTRAINT ON (p:Payment) ASSERT p.id IS UNIQUE",
        "CREATE CONSTRAINT ON (t:Transfer) ASSERT t.id IS UNIQUE",
        "CREATE CONSTRAINT ON (tx:Transaction) ASSERT tx.id IS UNIQUE",

        // Identity Types
        "CREATE CONSTRAINT ON (e:Email) ASSERT e.email IS UNIQUE",
        "CREATE CONSTRAINT ON (s:SSN) ASSERT s.ssn IS UNIQUE",
        "CREATE CONSTRAINT ON (p:Phone) ASSERT p.phoneNumber IS UNIQUE",
        };
}
And then simply firing them off one at a time with a utility method like:
import org.neo4j.driver.*;
import java.util.Arrays;

public class Database {
        public static void enforcePaySimSchema(Driver driver) {
                try (Session session = driver.session()) {
                        Arrays.stream(Cypher.SCHEMA_QUERIES).forEach(q -> session.run(q));
                }
        }
}
Step 2: Iteratively Loading PaySim Transactions
Recall from our previous post, we created an implementation of PaySim
that provides a simple Java Iterator that we can use to consume
transaction data.
But how do we get the Transactions into our graph?
Building a PaySim Transaction Cypher Query
We can take advantage of Cypher’s MERGE clause3 to do
double-duty and create our Client, Bank, and Merchant nodes while also
creating Transactions. There’s a catch: you can’t parameterize a label
in Cypher.
While Cypher won’t let you parameterize a node’s label, APOC’s
apoc.merge.nodeprocedure can do this for you if you’re willing to use APOC.
Since we’re using the Java Driver, we’re already writing code, so let’s just make it a 2 step process:
- Fill in an initial query template, using placeholders for the node labels
- Create the Neo4j
Queryinstance, adding our parameter values
Let’s take a look at a condensed solution:
import org.neo4j.driver.Query;
import org.paysim.base.Transaction;
import java.util.Map;

public class Cypher {
        public static final String SENDER_LABEL_PLACEHOLDER = "~STYPE~";
        public static final String RECEIVER_LABEL_PLACEHOLDER = "~RTYPE~";
        public static final String TX_LABEL_PLACEHOLDER = "~XTYPE~";

        public static final String INSERT_TRANSACTION_QUERY = String.join("\n", new String[] {
                  "MERGE (s:" + SENDER_LABEL_PLACEHOLDER + " { id: $senderId })",
                  "MERGE (r:" + RECEIVER_LABEL_PLACEHOLDER + " { id: $receiverId })",
                  "CREATE (tx:Transaction:" + TX_LABEL_PLACEHOLDER + " { id: $txId })",
                  "SET tx.ts = $ts, tx.amount = $amount, tx.fraud = $fraud,",
                  "    tx.step = $step, tx.globalStep = $globalStep",
                  "CREATE (s)-[:PERFORMED]->(tx)",
                  "CREATE (tx)-[:TO]->(r)",
          });
}

public class Util {
        public static Query compileTransactionQuery(Transaction t) {
                String rawQ = Cypher.INSERT_TRANSACTION_QUERY
                  .replace(Cypher.SENDER_LABEL_PLACEHOLDER, capitalize(t.getOrigType().toString()))
                  .replace(Cypher.RECEIVER_LABEL_PLACEHOLDER, capitalize(t.getDestType().toString()))
                  .replace(Cypher.TX_LABEL_PLACEHOLDER, capitalize(t.getAction()));
                Map<String, Object> props = propsFromTx(t);

                return new Query(rawQ, props);
    }
}
While maybe not the prettiest, it gets the job done! We templatize our
MERGE and CREATE clauses and use a helper function to take a given
PaySim Transaction and translate it into a Neo4j Query instance
ready for execution.
Batch Executing Cypher in Code
The best way to get high-throughput writes with a proper ACID database like Neo4j is to minimize the total number of transactions you need to perform. In the case of PaySim, a single simulation run with the default settings can produce millions of PaySim transactions. Let’s look at how to take an optimal approach.
There are two common batch loading patterns when using Cypher from an application utilizing a Neo4j driver:
- Open a write transaction session and execute many queries
- Use Cypher’s
UNWIND4 clause to iterate over a List of parameters in a single query
Which one should you use? Typically, the UNWIND approach is better
if you can massage your Cypher into utilizing it and can build up the
proper data structure of parameter values. Since we’re changing labels
in our MERGE=/=CREATE clauses, we can’t use UNWIND here unless we
want to write a very APOC-heavy query.
Luckily, the Neo4j drivers make it easy to take the first approach using Transaction functions5.
Let’s write a simple helper function that takes an established
Driver connection and a List of Neo4j Query instances to execute:
import org.neo4j.driver.*;
import java.util.List;

public class Database {
        public static int executeBatch(Driver driver, List<Query> queries) {
                try (Session session = driver.session()) {
                        int cnt = session.writeTransaction(tx -> {
                                  queries.forEach(q -> tx.run(q));
                                  return queries.size();
                        });
                        return cnt;
                }
        }
}
Now we just need to batch up the queries. There are probably a few
different approaches, but here’s one approach we can take using a
mutable List<Transaction> that effectively acts as a queue we flush
at some regular interval.
int batchSize = 500;
List<Query> batch = new ArrayList<>(batchSize);

// "sim" is an instance of IteratingPaySim and is already "running"
sim.forEachRemaining(t -> {
          batch.add(Util.compileTransactionQuery(t));

          if (batch.size() >= batchSize) {
                  Database.executeBatch(driver, batch); // our helper function
                  batch.clear();
          }
  });

// One last flush for any stragglers
if (batch.size() > 0) {
        Database.executeBatch(driver, batch);
}
In the above case, the driver will execute up to 500 queries per transaction, limiting the total number of transactions the database needs to log. Feel free to test out different batch sizes as they can have varying results dependent on things like how large the JVM heap is for the database, how many IOPS the underlyign storage layer provides, and general CPU clock speed.
Step 3. Disguising our Mules
In our previous step, we took the “type” of the agent from the
Transaction, so in situations where the agent was a Mule, the node
being merged only received a :Mule label.
Since we consider mules a type of Client, let’s disguise them as
:Client nodes.
We do this with a simple bit of Cypher to first find all the Mules we’ve yet to process and add an additional label to them:
MATCH (m:Mule) WHERE NOT m:Client
SET m :Client
RETURN m.id
Since the number of mules in our simulation tend to be a fraction of
the total number of clients, running it is trivial and we don’t need
to worry about Transaction functions and batching! Assuming we put the
above cypher into a public static String on our Cypher class:
// "driver" is a connected Neo4j Driver instance
driver.session().run(Cypher.MAKE_MULES_CLIENTS);
Step 4. Establishing Identities and their Relationships
At this point, we’ve got all our PaySim transactions and agents loaded into the graph. Now, for every client in the simulation, we want to create and connect their instances of identifiers through relationships.
We can do so with a little bit of paramterized cypher:
MERGE (c:Client {id: $clientId})
  ON MATCH SET c.name = $name
MERGE (s:SSN {ssn: $ssn})
MERGE (e:Email {email: $email})
MERGE (p:Phone {phoneNumber: $phoneNumber})
MERGE (c)-[:HAS_SSN]->(s)
MERGE (c)-[:HAS_EMAIL]->(e)
MERGE (c)-[:HAS_PHONE]->(p)
Like before in step 2, we’ll utilize the same batching technique of executing a set number of queries within a single database transaction in order to increase throughput.
In reality, this is a great candidate for the
UNWINDapproach mentioned above, but the author is lazy and didn’t want to write more code :-)
// Where "sim" is our IteratingPaySim instance and batchSize is previously defined
Lists.partition(sim.getClients(), batchSize).forEach(chunk -> {
          List<Query> queries = chunk.stream()
                .map(client -> Util.compileClientIdentityQuery(client.getClientIdentity()))
                .collect(Collectors.toList());
          Database.executeBatch(driver, queries);
  });
You’ll notice that like before, we’re building List<Query> that we
pass to our Database.executeBatch() helper method to run them within
the same transaction function.
However, there’s something new here: Lists.partition()6
This comes from a Google’s Guava library and very nicely takes a
java.util.List and makes a “list of lists”, partitioned into the
given size. Our code then works on taking batches of our PaySim
Clients and using transaction functions to bulk load the changes.
Step 5. Updating Additional Node Properties
PaySim provides some metadata that would be useful as properties on
some of our nodes. For transactions, most of these details are loaded
in our previous cypher like amount and the globalStep7. But
previously we were using Transaction instances to data-drive our
query and they don’t contain all the possible metadata related to the
agents involved.
Since PaySim tracks all the actors in the simulation, we can simply ask for references to each of them and bulk load any extraneous properties we may want to apply to the nodes in the graph, specifically a descriptive name property.
This approach may look like overkill and, given that it now uses the
Identityinterface from Modeling Identities it is a bit vestigial, however as we may add additional metadata to PaySim actors in the future, this serves as a generic way to easily capture them in the graph.
We’ll use another utility method from Google Guava, specifically the
Streams.concat(Stream<? extends T> ...streams)8 method. It
lets us form Java 8-style streams from our lists of Merchants and
Banks so we can operate on them all at once (since they both derive
from the same base class).
In this particular case, we’re mostly using it as a shortcut, since we
immediately collect the results into a List<SuperActor>. Merchants
and Banks make up a fractional amount of the simulation population, so
it’s not really a memory burden.
// Concatenate our streams of actors. For now we collect them ahead of time.
List<SuperActor> allActors = Streams.concat(
        sim.getMerchants().stream(),
        sim.getBanks().stream()).collect(Collectors.toList());

// Using our blended List<SuperActor>, process in bulk.
Lists.partition(allActors, config.batchSize).forEach(chunk -> {
          List<Query> queries = chunk.stream()
                .map(actor -> Util.compilePropertyUpdateQuery(actor))
                .collect(Collectors.toList());
          Database.executeBatch(driver, queries);
});
In this case, we’ll use a very simple Cypher query that treats nodes as property maps. Like when we loaded transactions, we’re doing the 2-pass approach of templatizing the label and parameterizing the property values in the Cypher.
static final String UPDATE_NODE_PROPS = "MATCH (n:" + LABEL_PLACEHOLDER + " {id: $id}) SET n += $props";
The use of the +=9 operator makes sure we only mutate
properties in the given map, so we don’t replace things like the
unique id property that we have managed by a uniqueness constraint.
Step 6. Thread Transactions into Chains
Our final step is threading each Client’s transactions into ordered
chains. We’ll finally use the UNWIND approach previously mentioned
but with a twist: We’re now going to rely on a very hand APOC function
to help out in constructing relationships.
At a high level, for each Client we want to get all their
transactions, order them into the sequence they occurred at, and then
related each transaction to the :NEXT one in the sequence. Here’s
how it looks:
// Where $ids is a list of the client ids we want to process
UNWIND $ids AS clientId
  MATCH (c:Client {id: clientId})-[:PERFORMED]->(tx:Transaction)
  WITH c, tx ORDER BY tx.globalStep
  WITH c, collect(tx) AS txs
  WITH c, txs, head(txs) AS _start, last(txs) AS _last

  MERGE (c)-[:FIRST_TX]->(_start)
  MERGE (c)-[:LAST_TX]->(_last)
  WITH c, apoc.coll.pairsMin(txs) AS pairs

  UNWIND pairs AS pair
    WITH pair[0] AS a, pair[1] AS b
    MERGE (a)-[n:NEXT]->(b)
    RETURN COUNT(n)
The apoc.coll.pairsMin() function10 takes a list of items and
generates overlapping tuples. For example:
RETURN apoc.coll.pairsMin([1, 2, 3, 4, 5])
Produces:
[[1, 2], [2, 3], [3, 4], [4, 5]]
We simply UNWIND this list of tuples and construct the :NEXT
relationships between each member. Et voilà!
Putting it All Together
Here’s a glimpse at the finished product, specifically a look at the
core loading logic from the App.run() method.11
public static void run(Config config) {
        IteratingPaySim sim = new IteratingPaySim(new Parameters(config.propertiesFile), config.queueDepth);

        final List<Query> batch = new ArrayList<>(config.batchSize);
        final ZonedDateTime start = ZonedDateTime.now();
        final AtomicInteger atom = new AtomicInteger(0);

        try (Driver driver = Database.connect(Database.defaultConfig, config.username, config.password)) {
            Database.enforcePaySimSchema(driver);

            try {
                sim.run();
                logger.info("Simulation started, load commencing...please, be patient! :-)");
                // Batch up Queries based on our Transaction stream for execution
                sim.forEachRemaining(t -> {
                    batch.add(Util.compileTransactionQuery(t));

                    if (batch.size() >= config.batchSize) {
                        atom.addAndGet(Database.executeBatch(driver, batch));
                        batch.clear();
                    }
                });

                // Anything left over?
                if (batch.size() > 0) {
                    atom.addAndGet(Database.executeBatch(driver, batch));
                }
                logger.info(String.format("[loaded %d PaySim transactions]", atom.get()));
                logger.info(String.format("[estimated load rate: %.2f PaySim-transactions/second]",
                        (float) atom.get() / Util.toSeconds(Duration.between(start, ZonedDateTime.now()))));

                logger.info("Labeling all Mules as Clients...");
                driver.session().run(Cypher.MAKE_MULES_CLIENTS);

                logger.info("Creating 'identity' materials associated with Client accounts...");
                Lists.partition(sim.getClients(), config.batchSize)
                        .forEach(chunk -> {
                            List<Query> queries = chunk.stream()
                                    .map(client -> Util.compileClientIdentityQuery(client.getClientIdentity()))
                                    .collect(Collectors.toList());
                            Database.executeBatch(driver, queries);
                        });

                logger.info("Setting any extra node properties for Merchants and Banks...");
                List<SuperActor> allActors = Streams.concat(
                        sim.getMerchants().stream(),
                        sim.getBanks().stream()).collect(Collectors.toList());
                Lists.partition(allActors, config.batchSize)
                        .forEach(chunk -> {
                            List<Query> queries = chunk.stream()
                                    .map(actor -> Util.compilePropertyUpdateQuery(actor))
                                    .collect(Collectors.toList());
                            Database.executeBatch(driver, queries);
                        });

                logger.info("Threading transactions...");
                final List<String> ids = Database.getClientIds(driver);
                Lists.partition(ids, config.batchSize).forEach(chunk -> {
                    Query query = new Query(Cypher.THREAD_TRANSACTIONS_IN_BATCH, Values.parameters("ids", chunk));
                    Database.execute(driver, query);
                });

            } catch (Exception e) {
                logger.error("EXCEPTION while loading data", e);
                try {
                    sim.abort();
                } catch (IllegalStateException ise) {
                    logger.warn("sim already aborted!");
                }
            }
        }

        Duration delta = Duration.between(start, ZonedDateTime.now());
        logger.info(String.format("Simulation & Load COMPLETED in %dm %ds", delta.toMinutes(), Util.toSecondsPart(delta)));
    }
Let’s Run It! 🏃
Let’s get down to business and run that code, shall we?
Assuming you’ve got the project cloned or downloaded and all the prerequisites in place, you can follow along.
Building the Demo Project
This part is easy thanks to the Gradle wrapper.
On macOS or *nix systems (with unzip available):
# build and package the demo
./gradlew distZip

# unpack a copy that contains all deps and start scripts
cd build/distributions
unzip paysim-demo-0.2.0.zip
cd paysim-demo-0.2.0

# validate you can run the demo by checking the program's help output
./bin/paysim-demo -h
Or on Windows systems using PowerShell:
# build and package the demo
.\gradlew.bat distZip

# unpack a copy that contains all deps and start scripts
cd build\distributions
Expand-Archive -Force .\paysim-demo-0.2.0.zip .
cd paysim-demo-0.2.0

# validate you can run the demo by checking the program's help output
bin\paysim-demo.bat -h
You can do the unzipping manually using whatever program you like. An
alternative to the zip file is to use the distTar task and use a
program to unpack the resulting tar file.
Tweak our Simulation Parameters
Now that we’ve got the demo built and unpacked, let’s set the parameters of our simulation. Ultimately there are five (5) types of levers we can push/pull to change the simulation outcome:
- seed for the random number generator
- nbSteps for the total number of steps to simulate
- nb[Clients/Fraudsters/Merchants/Banks] for setting the population sizes
- multiplier to scale the number of clients, fraudsters, and merchants by a factor of the multiplier (quick way to double or increase the population an order of magnitude)
- fraudProbability is the chance a Fraudster decides at a given step to engage in fraudulent activity
Changing the population size will have a dramatic effect on the size of the resulting database, so for now as you get started I recommend the keeping the default settings, but change the seed:
seed=12345
nbSteps=720
multiplier=1
nbClients=2000
nbFraudsters=100
nbMerchants=347
nbBanks=5
fraudProbability=0.004
Stage our Database
If you use the above simulation parameters, you’ll be producing a graph with approximately:
- 3.5 million nodes
- 10 million relationships
Which will translate to approximately a 1.5GB database (store + indexes) not counting transaction logs.
The default settings from Neo4j will suffice at first, but you may
want to bump things up a small amount by editing the neo4j.conf file
to change some heap and pagecache settings:
dbms.memory.heap.initial_size=1G
dbms.memory.heap.max_size=1G
dbms.memory.pagecache.size=1.5G
Install the APOC Library
If you’re using Neo4j Desktop, this step is easy. Click on “Add Plugin” in your PaySim project and then the “Install” button under the APOC library option.
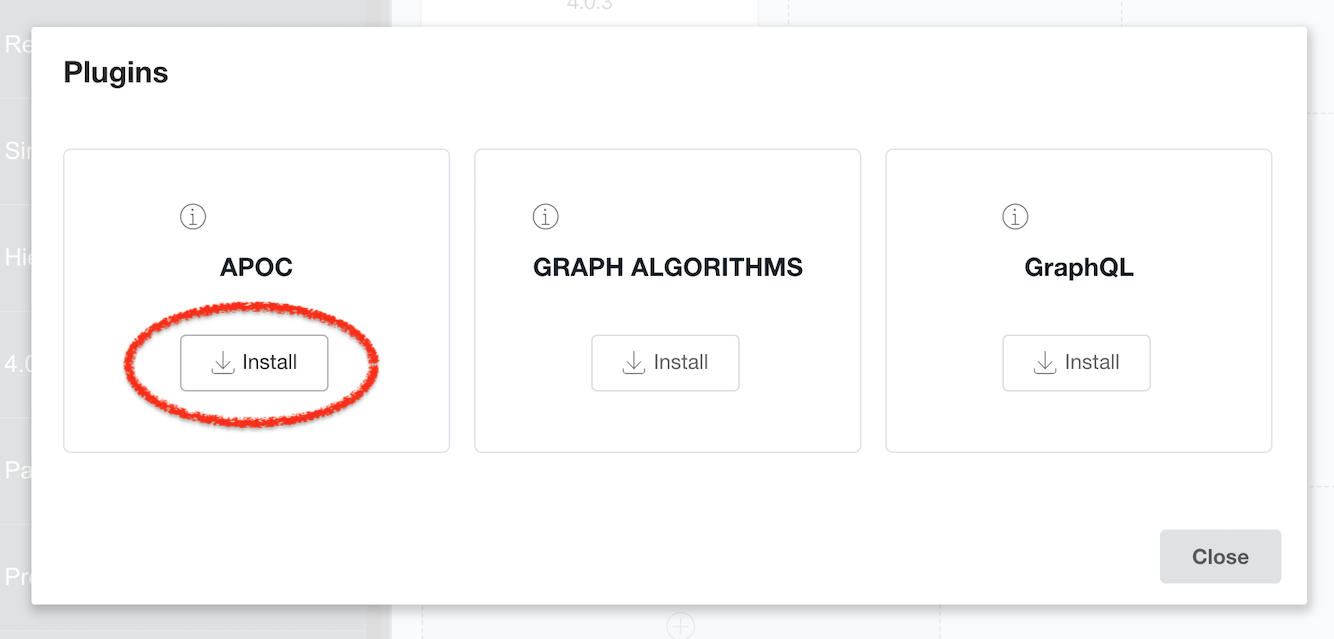
Figure 2: Installing APOC via Neo4j Desktop
If you’re not using Neo4j Desktop, grab a released APOC jar from the project on GitHub: https://github.com/neo4j-contrib/neo4j-apoc-procedures
If installing APOC manually, make sure to download a version that matches your Neo4j version (e.g. APOC 3.5.0.7 for Neo4j v3.5).
Make sure to restart the database after installing the plugin.
You can confirm APOC is installed and available by running the following Cypher:
CALL apoc.help('apoc')
Run the Simulation
This is the easiest part. Assuming you’ve followed the above
instructions to build the project, you just need to run the
appropriate bin/paysim-demo or bin\paysim-demo.bat script.
You can, and should, pass in any of the following command line arguments to match your Neo4j environment:
| Argument | Description | Default |
|---|---|---|
--properties |
Path to the PaySim.properties file | PaySim.properties |
--uri |
Bolt URI to your target Neo4j database | bolt://localhost:7687 |
--username |
Neo4j account to connect with | neo4j |
--password |
Password for the account | password |
--tls |
Use TLS encryption on Bolt connection? | false |
--batchSize |
Transaction batch size | 500 |
--queueDepth |
PaySim worker thread queue depth | 5000 |
On a relatively modern system12, running with my recommended parameters should take about 8-10 minutes. You’ll see output similar to the following:
[main] INFO Driver - Direct driver instance 1525919705 created for server address localhost:7687
[main] INFO io.sisu.paysim.App - Simulation started, load commencing...please, be patient! :-)
[SimulationWorker] INFO org.paysim.PaySimState - Init - Seed 12345
[SimulationWorker] INFO org.paysim.PaySimState - NbBanks: 5
WARNING: An illegal reflective access operation has occurred
WARNING: Illegal reflective access by com.google.inject.internal.cglib.core.$ReflectUtils$1 (file:/Users/dave/src/neo4j/paysim-demo/build/distributions/pays
im-demo-0.2.0/lib/paysim-2.1.0.jar) to method java.lang.ClassLoader.defineClass(java.lang.String,byte[],int,int,java.security.ProtectionDomain)
WARNING: Please consider reporting this to the maintainers of com.google.inject.internal.cglib.core.$ReflectUtils$1
WARNING: Use --illegal-access=warn to enable warnings of further illegal reflective access operations
WARNING: All illegal access operations will be denied in a future release
[SimulationWorker] INFO org.paysim.PaySimState - NbMerchants: 3474
[SimulationWorker] INFO org.paysim.PaySimState - NbFraudsters: 1000
[SimulationWorker] INFO org.paysim.PaySimState - NbClients: 20000
[main] INFO io.sisu.paysim.App - [loaded 3406242 PaySim transactions]
[main] INFO io.sisu.paysim.App - [estimated load rate: 8307.91 PaySim-transactions/second]
[main] INFO io.sisu.paysim.App - Labeling all Mules as Clients...
[main] INFO io.sisu.paysim.App - Creating 'identity' materials associated with Client accounts...
[main] WARN RetryLogic - Transaction failed and will be retried in 817ms
[main] INFO io.sisu.paysim.App - Setting any extra node properties for Merchants and Banks...
[main] INFO io.sisu.paysim.App - Threading transactions...
[main] INFO Driver - Closing driver instance 1525919705
[main] INFO ConnectionPool - Closing connection pool towards localhost:7687
[main] INFO io.sisu.paysim.App - Simulation & Load COMPLETED in 8m 44s
You’ll notice you may get a
Transaction failed and will be retried...warning. Don’t worry: this is a minor bug in my implementation but thanks to the transaction functions auto-retry feature you can ignore this.
Confirm our Graph is Loaded
Using either Neo4j Browser or cypher-shell, connect to your Neo4j instance. You should see a plethora of data!
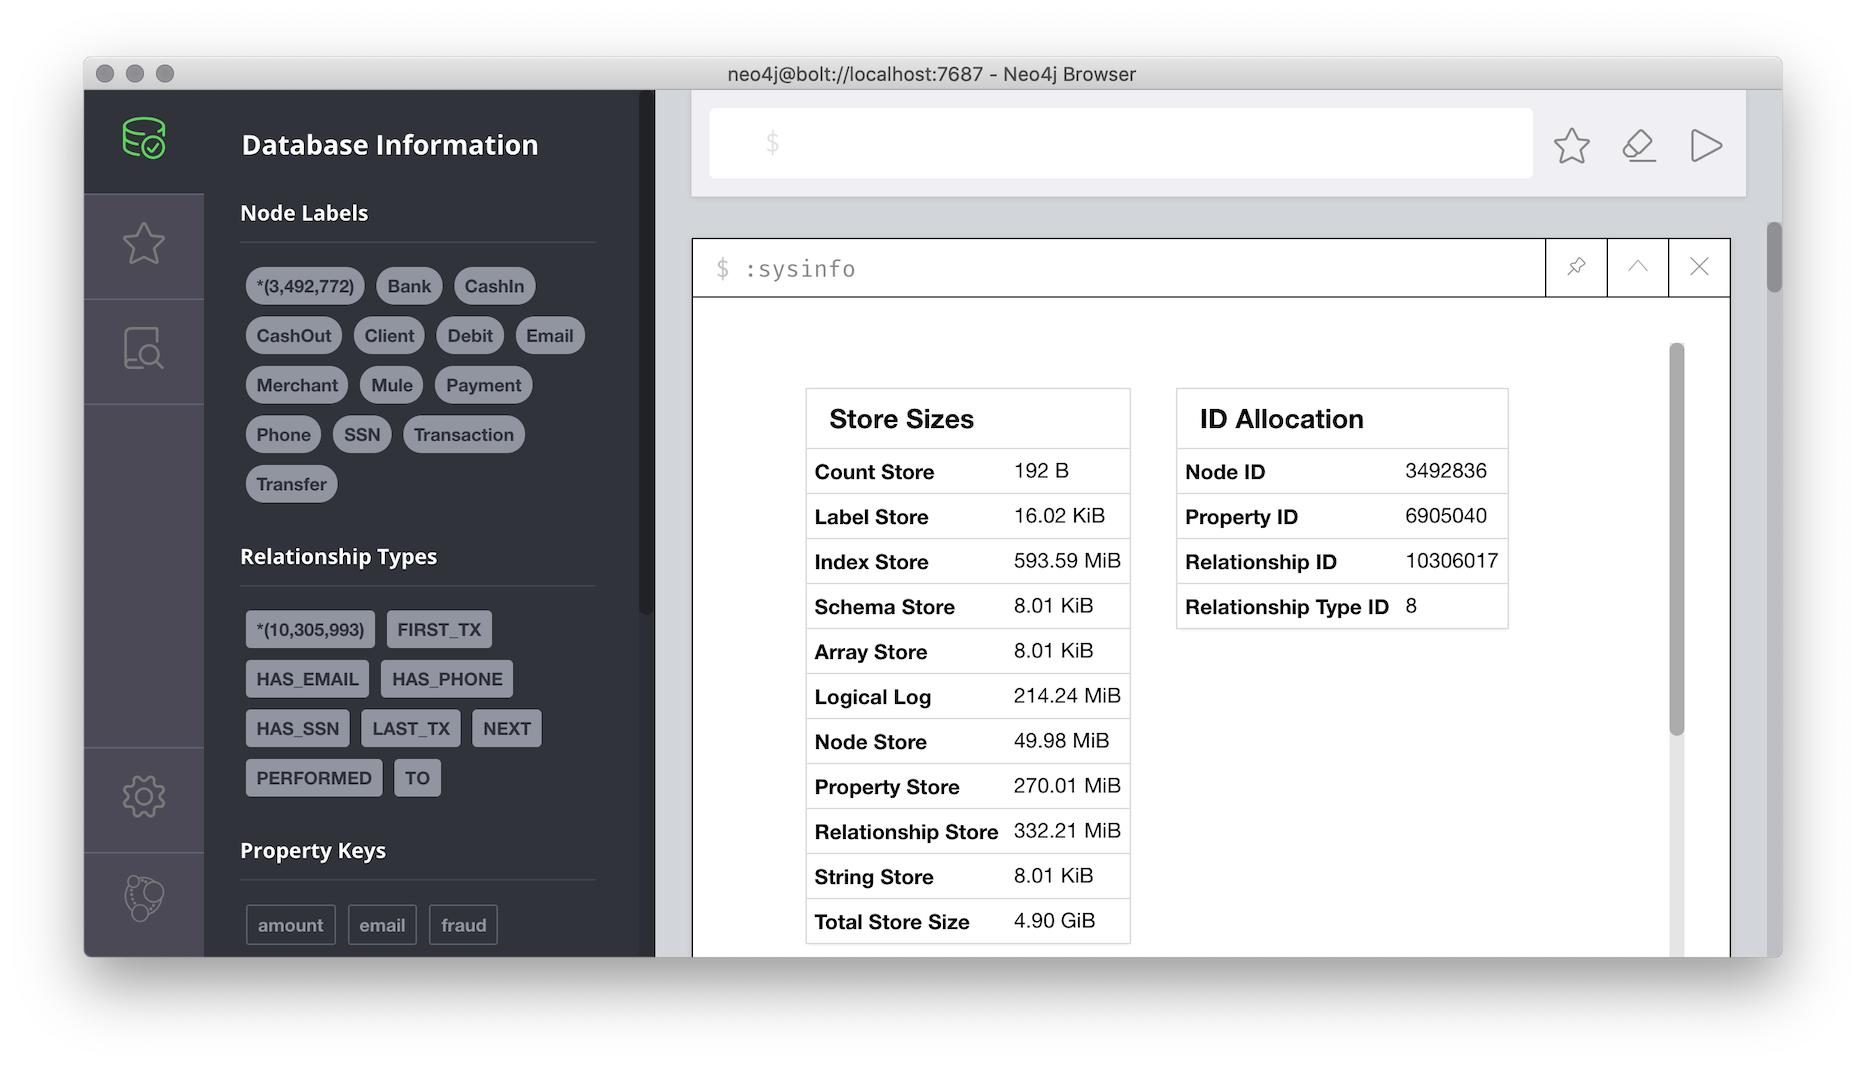
Figure 3: Preview of our PaySim data
Make sure you see the appropriate labels and relationships available.
Wrapping Up
At this point you can play around with exploring the graph through Cypher and Neo4j Browser. Maybe create a few different databases using different parameters to see how things change.
Next Time: Analyzing our Graph
We’ve now covered some background on PaySim and, in this post, covered how to take PaySim and populate a Neo4j graph database.
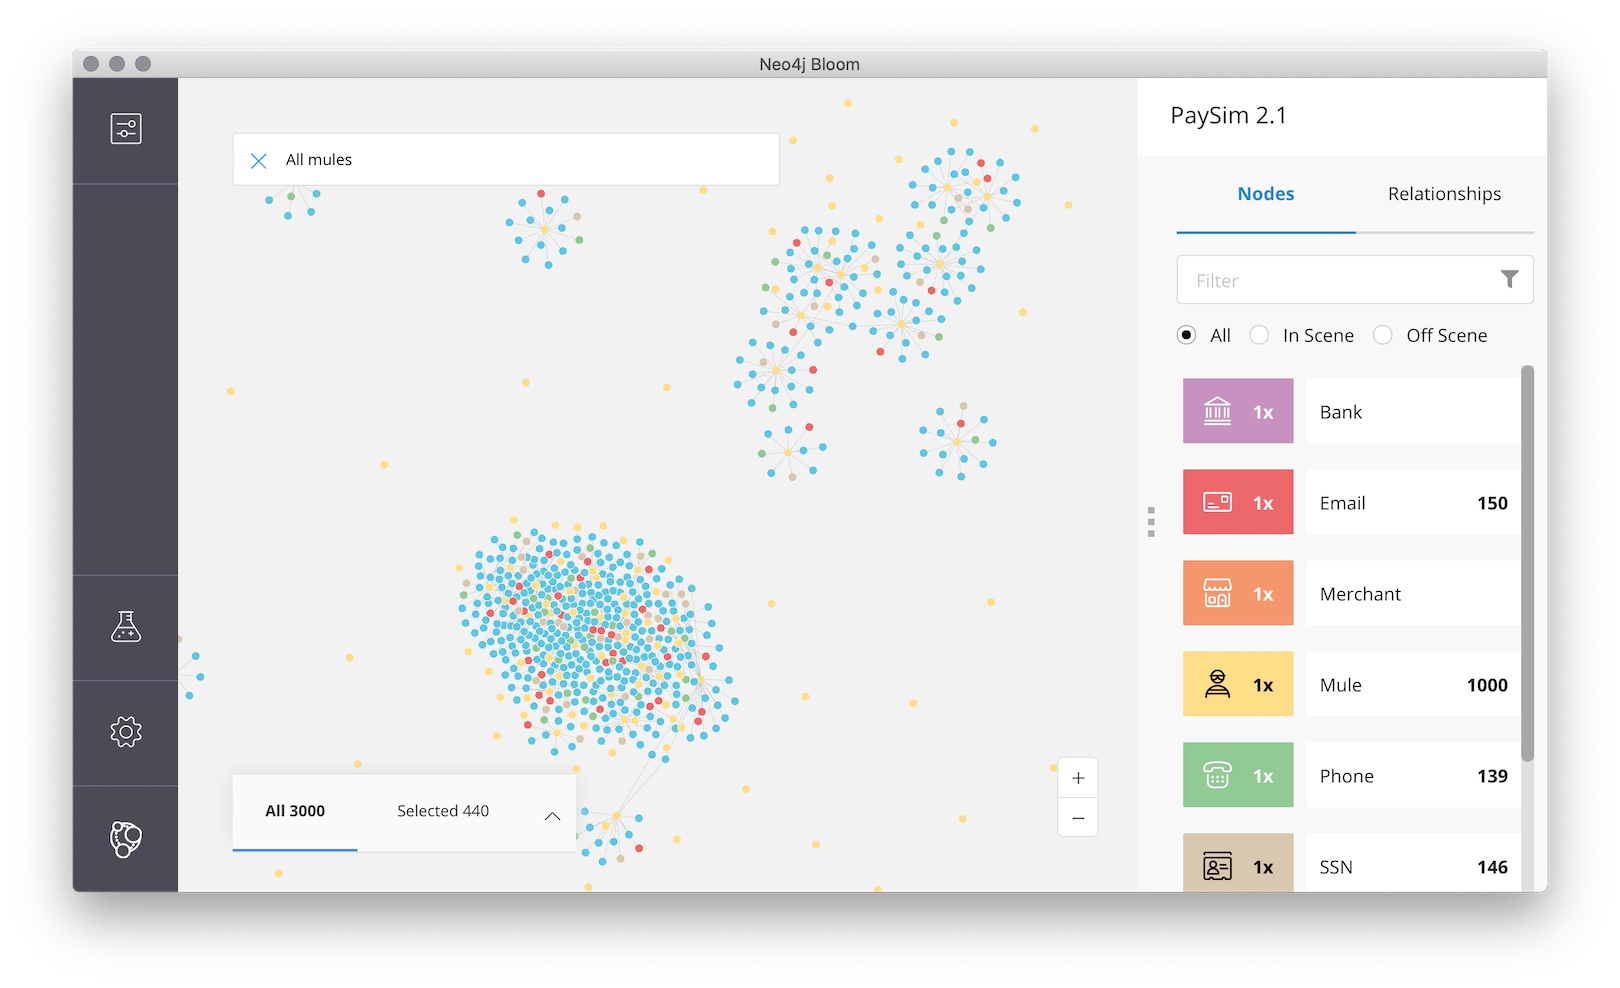
Figure 4: A preview of what’s to come
Next we’ll look at ways to exploit the connectedness of the graph to identify fraudulent transactions and mule accounts.
Tot ziens!
-
I recommend using an OpenJDK from https://adoptopenjdk.net/ ↩︎
-
See https://neo4j.com/docs/driver-manual/1.7/sessions-transactions/#driver-transactions-transaction-functions for more details. Transaction functions are supported across many driver languages including: C#, Go, Java, JavaScript, and Python. A major nicety of transaction functions is they can handle transient errors automatically and use retries without any additional code. ↩︎
-
https://guava.dev/releases/snapshot/api/docs/com/google/common/collect/Lists.html#partition-java.util.List-int- ↩︎
-
globalStep is an artifact of the
IteratingPaySimimplementation and effectively is the sequence number for which order a transaction occurred. It can be used to identify if any one transaction happened before another, but step must be used to get a baseline approximation of the time a transaction occurred. ↩︎ -
https://guava.dev/releases/23.0/api/docs/com/google/common/collect/Streams.html#concat-java.util.stream.Stream...- ↩︎
-
https://neo4j.com/docs/cypher-manual/4.0/clauses/set/#set-setting-properties-using-map ↩︎
-
See https://neo4j.com/docs/labs/apoc/current/data-structures/collection-list-functions/ for more details on this and other APOC list/collection functions. ↩︎
-
https://github.com/voutilad/paysim-demo/blob/a72a8e6172b0d58ae9c340c65386f96adc0acc95/src/main/java/io/sisu/paysim/App.java ↩︎
-
I’m running this on an Intel i7-4790K CPU @ 4.00GHz, so not the newest of CPUs, but still pretty speedy. This is in a Late 2014 iMac with 32GB of RAM and an SSD. ↩︎